

How To Repair Water Damaged Plaster
How to Repair a Water Damaged Ceiling
19 March, 2022 Home Repairs
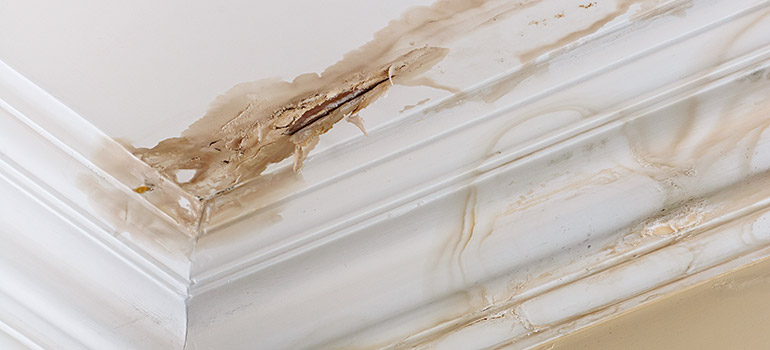
Water can discover its way through pretty much anything, making it a serious threat, especially when it comes to your home. If you notice a strange discolouration or, worse, a sagging ceiling, then you can be certain that h2o is leaking into your habitation. It is essential to take activity immediately before your piece of furniture or holding gets damaged further.
What's causing the h2o damage on your ceiling
The damage to your ceiling will only worsen over fourth dimension, so the most important thing to do is found where the water is coming from. At that place are several possible sources:
- Plumbing issues – Pay attention where exactly the damage on your ceiling appears. If yous know, information technology's beneath a bathroom or kitchen. And then the leak is probably caused by a faulty chemical element in the shower, drain, sink or toilet. If your home'due south plumbing system is onetime, a corroded piping could exist as well responsible for the impairment.
- Damaged roof – Heavy rainfall and severe weather conditions can best reveal a problem with your abode'southward roofing system. If the h2o is already dripping from your ceiling and you observe that it's brown and not clear, then chances are at that place'due south a leak in your roof that needs to be checked correct away.
Pro tip: Nosotros don't suggest y'all to climb to see for yourself, especially if the weather conditions are bad and the surface is moisture and slippery. It's better to contact a specialist for inspection and not risk your wellness in the process.
What to do in case of a leaking ceiling
Plaster or drywall, a leaking ceiling is a serious matter, and y'all need to accept measures right away to protect your property. Here is what you can do:
- Remove your holding – Move article of furniture further away from the wet areas and attempt to absorb as much of the liquid as possible earlier it damages the flooring. Lay downward towels and place buckets, and other containers suitable to collect the water dripping from the ceiling.
- Appraise the harm – Thoroughly inspect the affected area and effort to locate where the h2o is coming from. Drywall ceilings can absorb water, so there is a little chance of dripping unless there is major impairment. That'southward not the case with plaster, though, which tends to detain the water until it's soaked up and and then release information technology. If the latter happens, information technology is all-time to poke a pocket-sized pigsty into the sagging ceiling to release the collected water. Make sure you have a bucket and that the floor is fully protected before you do information technology.
- Set up the expanse for repairment – At present that you have the situation under command and, hopefully, the source of the problem fixed, yous tin move on to repairing the ceiling. Ensure you clean out the area, remove all water and excessive wet to prevent mould growth, comprehend the floors with paper or plastic covers (whatever y'all have) to protect it, and provide skillful ventilation by opening the windows.
How to repair a h2o damaged plaster ceiling
What you volition need:
- Putty pocketknife
- Ladder
- Protective glasses
- Primer
- Articulation compound
- Mud pan
- Sanding block
- Paint and brushes
- Clean cloth
- Eliminate all damaged pieces from the ceiling – Make sure the ceiling is dry earlier you lot start repairing. Begin by removing with the putty knife cracked paint and plaster that the water has damaged. The surface needs to be completely smooth for the patching.
- Make full holes and cracks – When the area is completely make clean, y'all might notice cracks and even holes. Mix the articulation compound in the mud pan and fill those up. Leave to dry earlier moving forward.
- Cover up the surface – Add together ane coat of primer, so apply the joint compound with the putty knife. It needs approximately 10-fifteen minutes to harden, and then you can add together some other coat. Make sure the layers are thin, or it will accept likewise long to dry.
- Sand the expanse – Once the compound is fully dry, put on your safety glasses and use the sanding block to remove whatsoever imperfections on the ceiling. Then, dampen the cloth and wipe information technology to remove the dust.
- Add some other coat of primer – Make certain you cover up the whole area.
- Retouch with waterproof paint – Wait a little bit for the primer to dry completely, and and then you can start painting until the repaired area blends with the rest of your ceiling. If you demand tips on how to do it, you lot can check our Ceiling Painting: Learn from the Pros guide.
How to repair a h2o damaged drywall ceiling
Plasterboard is very porous and tin can easily blot water. Still, a articulation compound can fix the smaller damages in the form of cracks or holes. Notwithstanding, severe ones like softening or aging of the textile and sagging of the ceiling volition require cutting and installing new drywall sheets. Here is how to practice it!
Additional things you lot will demand:
- Drywall sheets
- Drywall saw
- Tape measure
- Plasterboard screws
- Mesh tape
- Utility knife
- Cordless drill
- Taping pocketknife
- Plywood strips
- Ceiling paint
- Make clean out the area – Remove any damaged pieces that are hanging from the ceiling.
- Make up one's mind how much to cutting out – To make things easier you lot can measure and draw to have a clear view. Use the drywall saw to cutting all the damaged plaster out.
- Cut the plywood strips – Adjacent, y'all demand to measure the size of the hole and cutting the plywood strips accordingly. Leave a niggling actress on both sides for stability.
- Attach the material to the strips – Place the sometime inside the hole and secure the drywall by driving the plasterboard screws through it into the wood with the drill.
- Add the new plasterboard – Carefully mensurate the hole and, based on that, cut the new drywall piece from the canvas. Adhere it with the screws to the wood, as well.
- Comprehend with the joint compound – Mix the joined compound, as well known equally mud. Apply some on the joined areas with the putty knife, stroking forward and backwards. Encompass with the drywall mesh record. Smooth it out with the knife. Finally, use the mud over the whole expanse using the taping knife.
- Sand, reapply and paint – Allow dry, sand the surface area and then reapply. One time the expanse is completely smooth and dry, you tin move on to painting.
Pro tip: Keep in mind that such a project can accept upward a few days. If you lot've never worked with plasterboard before and feel uncertain about the outcome, we suggest you look for an expert in your area to take care of the repairing of the ceiling.
Costs of repairing a water damaged ceiling
Every projection is different, and so there are a lot of variables to take into consideration. Several chief factors play a role in determining how much you will accept to spend on repairing your ceiling. Such every bit:
- The amount of damage – Milder damages can be fixed in a few hours and won't require that much labour, while tasks like replacing drywall sheets are more circuitous and extensive.
- The fourth dimension that the professionals will need to fix the ceiling – Since a handyman service is often charged by the hour, time is a crucial cistron in the concluding cost estimation.
- The materials that will be required for the chore – These may be provided by you or included in the toll of the service when the professionals supply them.
- Boosted tasks that you lot may crave – Things like cornice installation could exist an extra charge.
Every bit y'all can see, repairing a water damaged ceiling is no piece of cake job, and many things could influence the pricing. For sure, though, one matter is that such a task requires a level of expertise to assess the situation correctly and select the nearly suitable approach.
Fantastic handyman professionals are operating in all major cities of Commonwealth of australia, and they have solid experience in patching holes on ceilings, plastering and cornice replacement. The toll for repairing a ceiling is charged per hour, starting from $55. In that location is a minimum accuse of $135 where you are entitled to 2 hours of work, which could be sufficient to ready smaller amercement on your ceiling.
What to look from a professional person service
- More serious cases definitely require an inspection from our specialist earlier we can tell y'all how much it will price, while minor jobs can be quoted over the phone.
- The professional handymen volition thoroughly inspect the area and make a plan of activity.
- They will provide all the necessary equipment for the job. You can either provide the required materials, or the specialist can have care of that.
- The Fantastic handyman volition replaster and fix any small and large damaged areas on your ceiling in full. Wall repairing is as well part of their expertise so that they can take care of those, additionally.
- Full repainting of the affected ceiling area volition exist washed to erase the traces of the water damage completely.
Don't postpone repairing water amercement in your home
Rent a reliable handyman
You can volume our handyman services in Melbourne, Sydney, Brisbane and Perth!
Would dearest your thoughts, please annotate.x

Source: https://fantastichandyman.com.au/blog/how-to-repair-water-damaged-ceiling/
Posted by: littlediesse.blogspot.com
0 Response to "How To Repair Water Damaged Plaster"
Post a Comment